> ## Documentation Index
> Fetch the complete documentation index at: https://docs.juneops.com/llms.txt
> Use this file to discover all available pages before exploring further.
# Okta SSO Setup
> Configure SSO authentication for your June organization using Okta
Enable Single Sign-On (SSO) so teammates can access June with their existing Okta credentials.
## What you'll accomplish
* Configure Okta as your SSO provider
* Create an OIDC app integration in Okta
* Enable seamless authentication for your team
* Improve security with centralized identity management
## Prerequisites
Make sure you have:
* **Okta Admin access** to create app integrations
* **June organization admin** permissions
* **Verified email domain** set up in June via **Settings > Email Domains**
June currently supports Okta as the SSO provider. Additional identity
providers are coming soon.
## Step 1: Create the Okta app integration
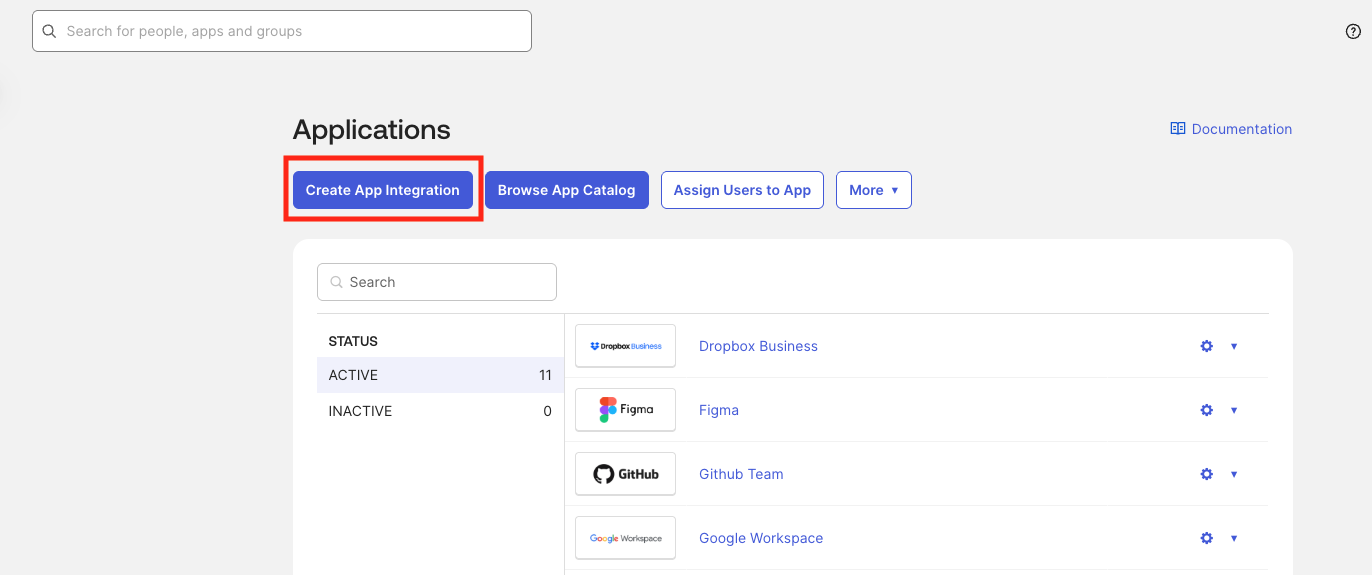
1. Log into the Okta admin console.
2. Go to **Applications** > **Applications**.
3. Click **Create App Integration**.
 1. Select **OIDC - OpenID Connect**.
2. Choose **Web Application**.
3. Click **Next**.
1. Select **OIDC - OpenID Connect**.
2. Choose **Web Application**.
3. Click **Next**.
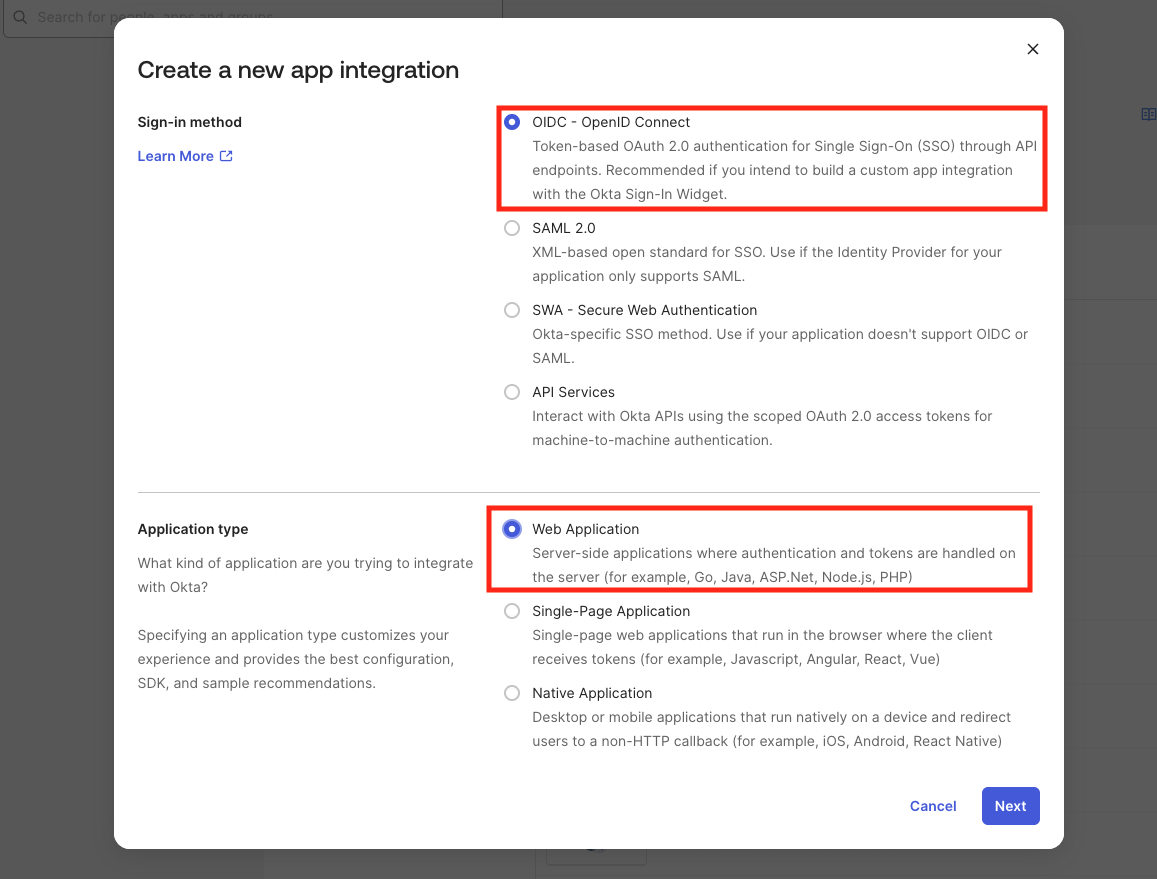 OIDC is recommended for web apps because it delivers OAuth 2.0 tokens with
Single Sign-On support.
* **App integration name**: Use something clear like "June SSO".
1. In **Sign-in redirect URIs**, enter `https://auth.juneops.com/oauth2/idpresponse`.
2. Leave **Sign-out redirect URIs** empty (optional).
OIDC is recommended for web apps because it delivers OAuth 2.0 tokens with
Single Sign-On support.
* **App integration name**: Use something clear like "June SSO".
1. In **Sign-in redirect URIs**, enter `https://auth.juneops.com/oauth2/idpresponse`.
2. Leave **Sign-out redirect URIs** empty (optional).
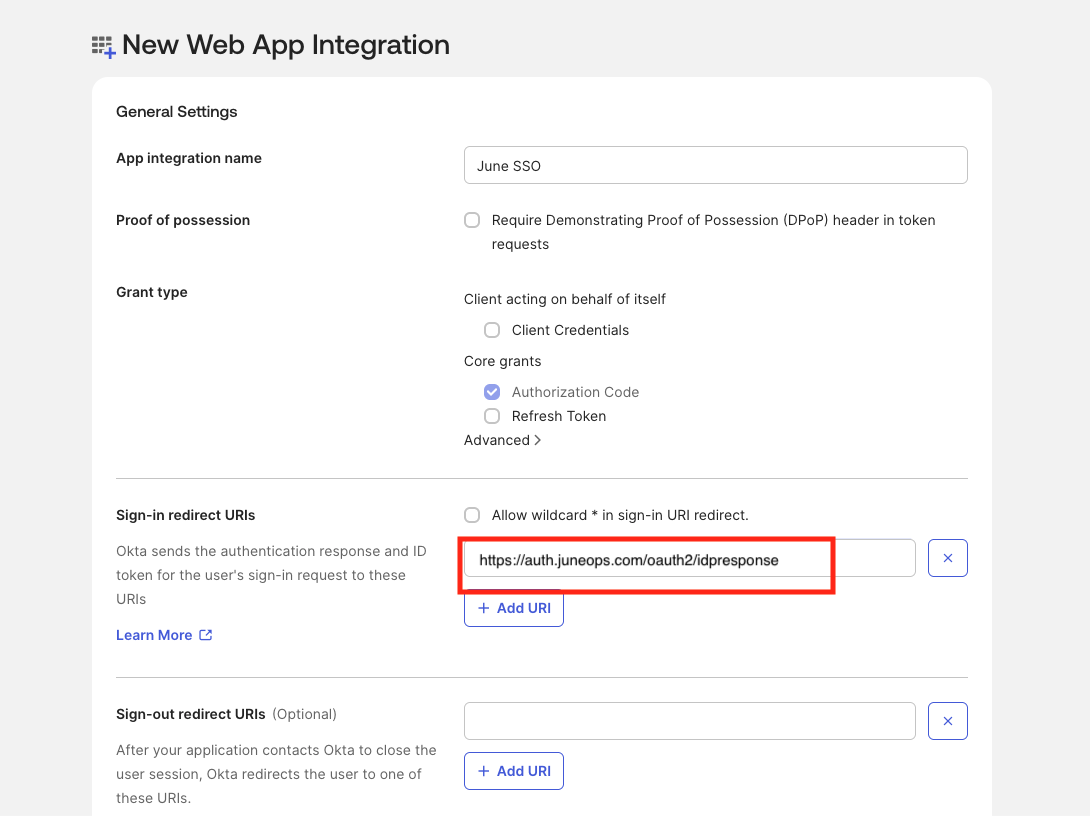 The redirect URI must match exactly `https://auth.juneops.com` for SSO to
succeed.
Choose who can use June through Okta:
* Allow everyone in your organization.
* Limit to selected groups for a safer pilot.
* Skip now and assign later.
The redirect URI must match exactly `https://auth.juneops.com` for SSO to
succeed.
Choose who can use June through Okta:
* Allow everyone in your organization.
* Limit to selected groups for a safer pilot.
* Skip now and assign later.
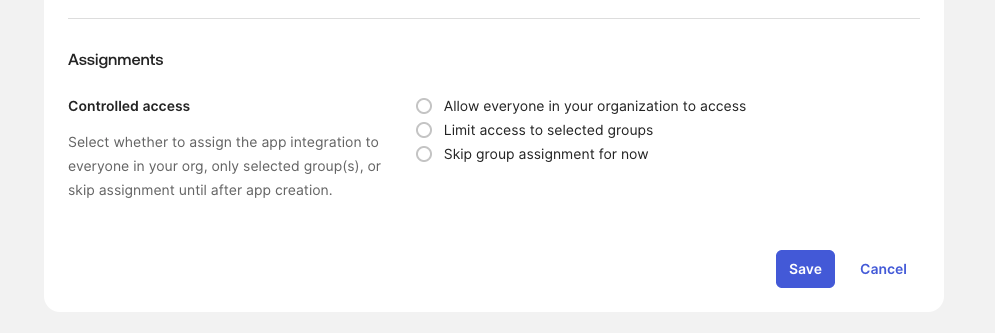 Start with a small test group, then expand once validation succeeds.
1. Click **Save** to create the app.
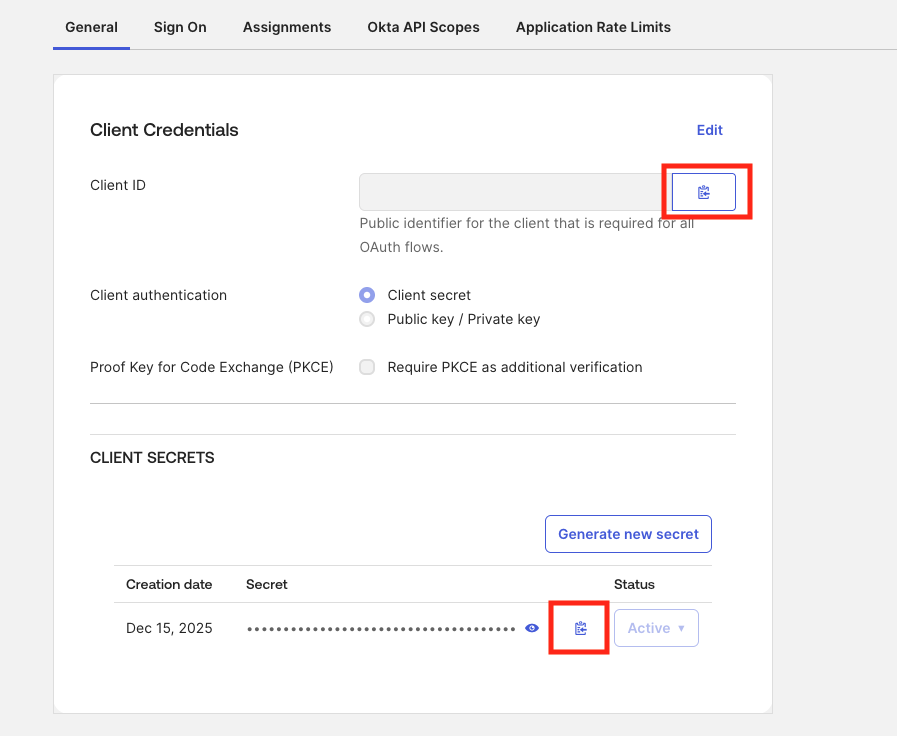
2. On the **General** tab, find **Client Credentials**.
3. Copy the **Client ID**.
4. Copy the **Client Secret** (click to reveal before copying).
Start with a small test group, then expand once validation succeeds.
1. Click **Save** to create the app.
2. On the **General** tab, find **Client Credentials**.
3. Copy the **Client ID**.
4. Copy the **Client Secret** (click to reveal before copying).
 Keep the Client Secret private—never share it or commit it to version
control.
## Step 2: Select your authorization server in Okta
1. In Okta admin, go to **Security > API > Authorization Servers**.
Keep the Client Secret private—never share it or commit it to version
control.
## Step 2: Select your authorization server in Okta
1. In Okta admin, go to **Security > API > Authorization Servers**.
 * Use the **default** authorization server or a custom server you maintain for June.
* Ensure any required scopes are enabled on this server.
1. With the server selected, open the **Access Policies** tab.
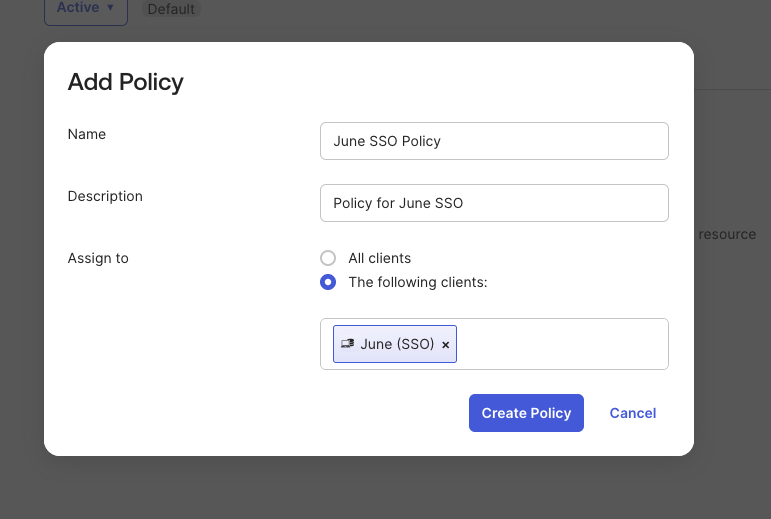
2. Click **Add New Access Policy** and configure it for June. Create the
policy before adding any policy rules.
* Use the **default** authorization server or a custom server you maintain for June.
* Ensure any required scopes are enabled on this server.
1. With the server selected, open the **Access Policies** tab.
2. Click **Add New Access Policy** and configure it for June. Create the
policy before adding any policy rules.
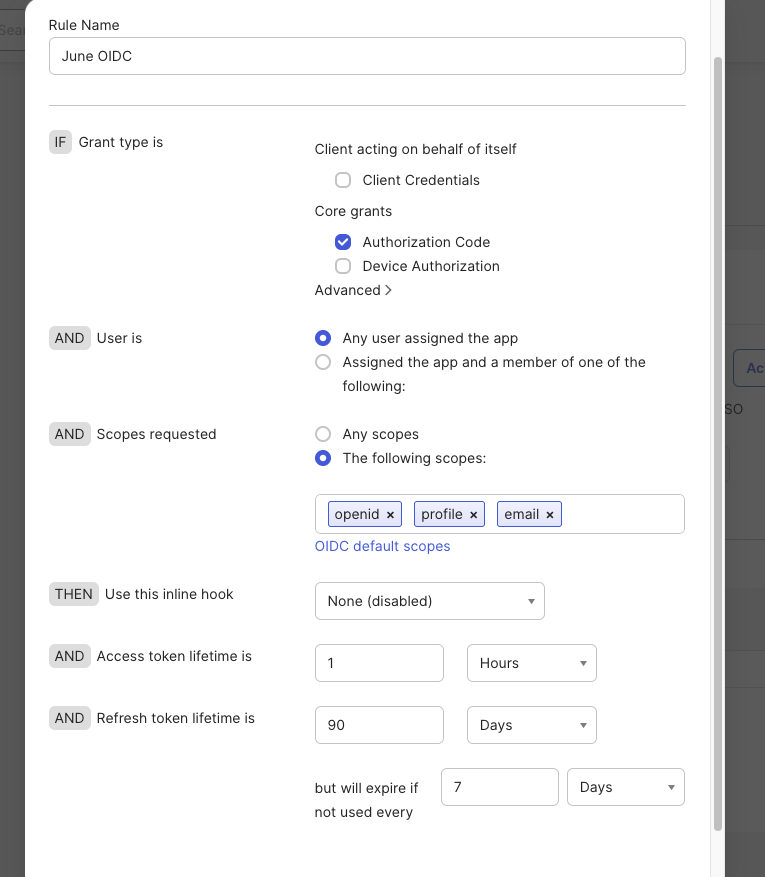
 1. Open the policy you just created and click **Add Rule**.
2. Required **Grant type**: **Authorization Code**.
3. Required scopes: **openid**, **profile**, **email**.
4. Everything else can stay at defaults unless you have specific requirements.
1. Open the policy you just created and click **Add Rule**.
2. Required **Grant type**: **Authorization Code**.
3. Required scopes: **openid**, **profile**, **email**.
4. Everything else can stay at defaults unless you have specific requirements.
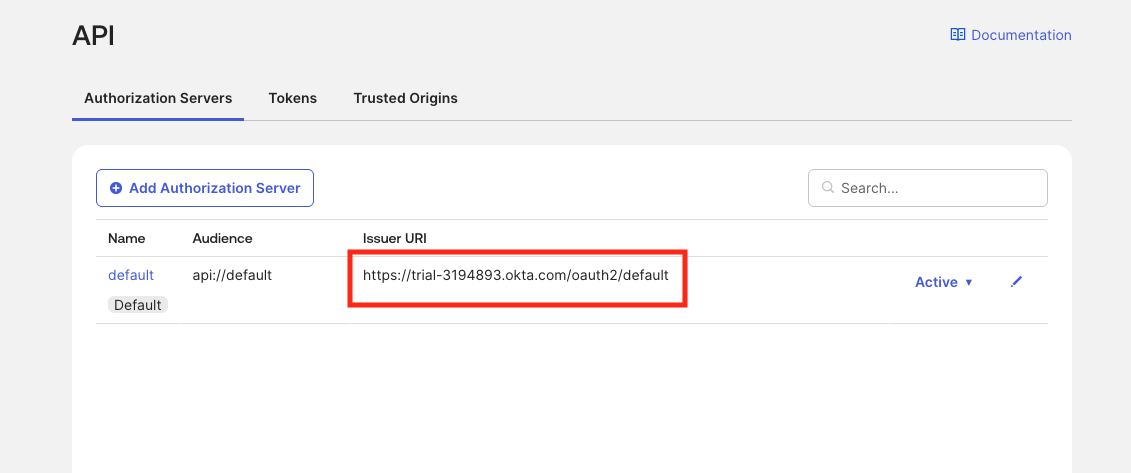
 1. Open the server and go to **Settings**.
2. Copy the **Issuer URI** exactly as shown (keep the full path).
3. You will paste this into June in the next section.
1. Open the server and go to **Settings**.
2. Copy the **Issuer URI** exactly as shown (keep the full path).
3. You will paste this into June in the next section.
 ## Step 3: Configure SSO in June
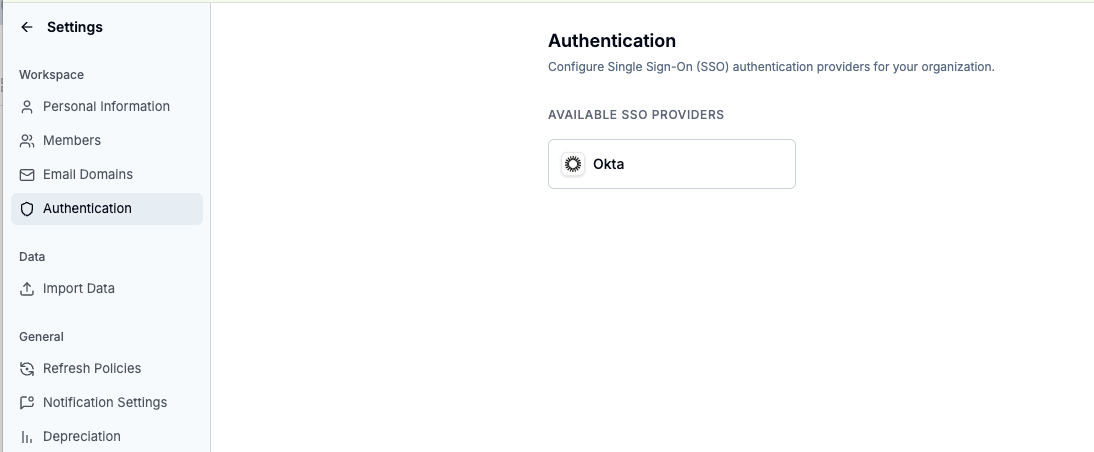
1. Sign into the June dashboard.
2. Go to **Settings**.
3. Select **Authentication**.
4. Choose **Okta** under Available SSO Providers.
## Step 3: Configure SSO in June
1. Sign into the June dashboard.
2. Go to **Settings**.
3. Select **Authentication**.
4. Choose **Okta** under Available SSO Providers.
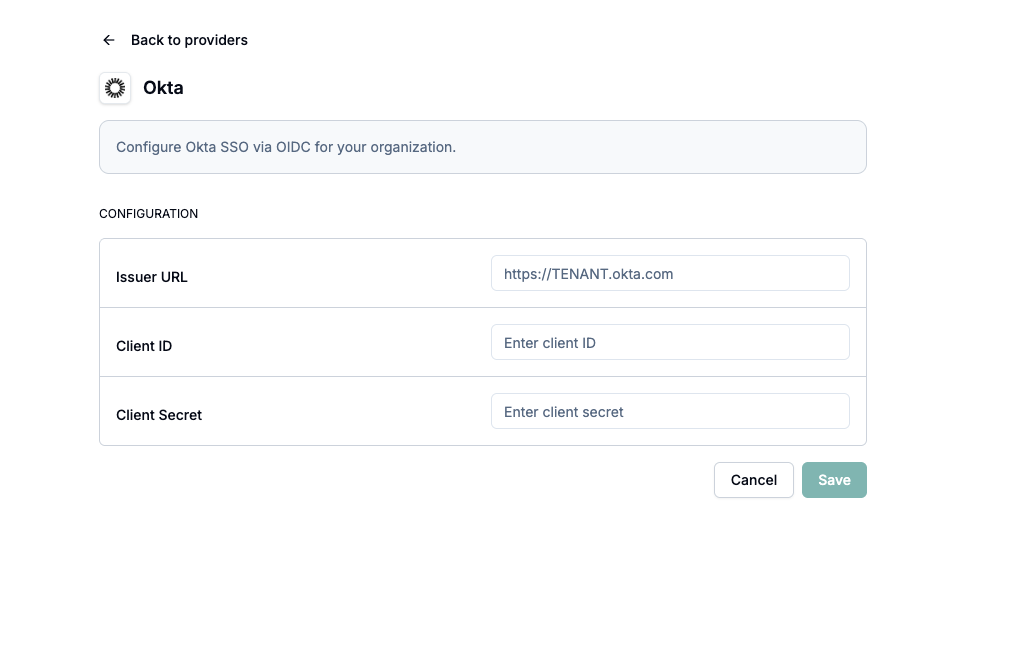
 1. **Issuer URL**: Paste the Issuer you copied from your chosen authorization server (Security > API > Authorization Servers).
2. **Client ID**: Paste the value from Okta.
3. **Client Secret**: Paste the secret from Okta.
1. **Issuer URL**: Paste the Issuer you copied from your chosen authorization server (Security > API > Authorization Servers).
2. **Client ID**: Paste the value from Okta.
3. **Client Secret**: Paste the secret from Okta.
 1. Click **Save** in June.
After you save, Okta SSO can take a few minutes to finish initializing. Users
may briefly see a login error during this window—wait a couple of minutes and
try again.
## Authentication flow
1. User enters their email on June and clicks **Continue**.
2. June redirects the user to Okta for sign-in.
3. After successful Okta authentication, the user is returned and logged into
June automatically.
If the user already has an active Okta session, the redirect back to June
completes without prompting for credentials.
## User management
### First-time SSO users
* June creates the account automatically.
* Profile data (name, email) comes from Okta.
### Existing June users
* Existing accounts are linked by matching email.
* Users are logged out and must sign in with Okta; prior login methods are no
longer valid.
* Permissions and data remain intact.
## Support resources
* Email June Support: [support@juneops.com](mailto:support@juneops.com)
* Okta reference: [OIDC Web App Guide](https://developer.okta.com/docs/guides/sign-into-web-app-redirect/go/main/)
Once SSO is configured, your users get a seamless, secure login experience,
and you get centralized identity management with stronger security controls.
1. Click **Save** in June.
After you save, Okta SSO can take a few minutes to finish initializing. Users
may briefly see a login error during this window—wait a couple of minutes and
try again.
## Authentication flow
1. User enters their email on June and clicks **Continue**.
2. June redirects the user to Okta for sign-in.
3. After successful Okta authentication, the user is returned and logged into
June automatically.
If the user already has an active Okta session, the redirect back to June
completes without prompting for credentials.
## User management
### First-time SSO users
* June creates the account automatically.
* Profile data (name, email) comes from Okta.
### Existing June users
* Existing accounts are linked by matching email.
* Users are logged out and must sign in with Okta; prior login methods are no
longer valid.
* Permissions and data remain intact.
## Support resources
* Email June Support: [support@juneops.com](mailto:support@juneops.com)
* Okta reference: [OIDC Web App Guide](https://developer.okta.com/docs/guides/sign-into-web-app-redirect/go/main/)
Once SSO is configured, your users get a seamless, secure login experience,
and you get centralized identity management with stronger security controls.