> ## Documentation Index
> Fetch the complete documentation index at: https://docs.juneops.com/llms.txt
> Use this file to discover all available pages before exploring further.
# Okta Integration
> Complete integration guide for connecting Okta with June for SSO and user provisioning
 Connect your Okta environment with June to enable secure API-based access to users, groups, and application assignments.
## What you'll accomplish
* Create an Okta OAuth 2.0 application
* Assign admin roles to the app
* Provide June with your client ID and tenant URL
* Enable automated identity data ingestion
## Capabilities
Once connected, June provides the following capabilities for Okta:
### Data Synchronization
| Capability | Description |
| ------------------------------ | --------------------------------------------------------------------------- |
| **Sync all employees** | Sync all your employees into June. For IDP integrations, this is always on. |
| **Sync Software Applications** | Sync all your software applications into June. |
| **Sync locations** | Sync all your office locations into June. |
### Security Actions
| Capability | Description |
| -------------------------------- | ------------------------------------------------------------------------------------------------------------------------------------------------------------------ |
| **Expire user password in Okta** | Expire a user's password in Okta, forcing them to change it on next login. This is a security action used for compromised accounts or password policy enforcement. |
| **Reset user MFA in Okta** | Reset all MFA factors for a locked out user in Okta. This removes all enrolled MFA factors and allows the user to enroll new ones. |
### Group Management
| Capability | Description |
| ------------------------------- | --------------------------------------------------------------------------------------------------------- |
| **Add user to Okta group** | Add an employee to an Okta group to grant them group-based access and permissions. |
| **Remove user from Okta group** | Remove an employee from an Okta group to revoke their group-based access and permissions. |
| **List Okta groups** | Retrieve a list of all groups in Okta. Optionally filter by search query to find specific groups by name. |
| **Get Okta group details** | Retrieve detailed information about a specific Okta group including its members. |
## Prerequisites
Before starting the integration, ensure you have:
* Okta Super Admin access
* Access to create OAuth 2.0 applications in Okta
## Okta OAuth 2.0 Application setup
### Step 1: Add June Application in Okta
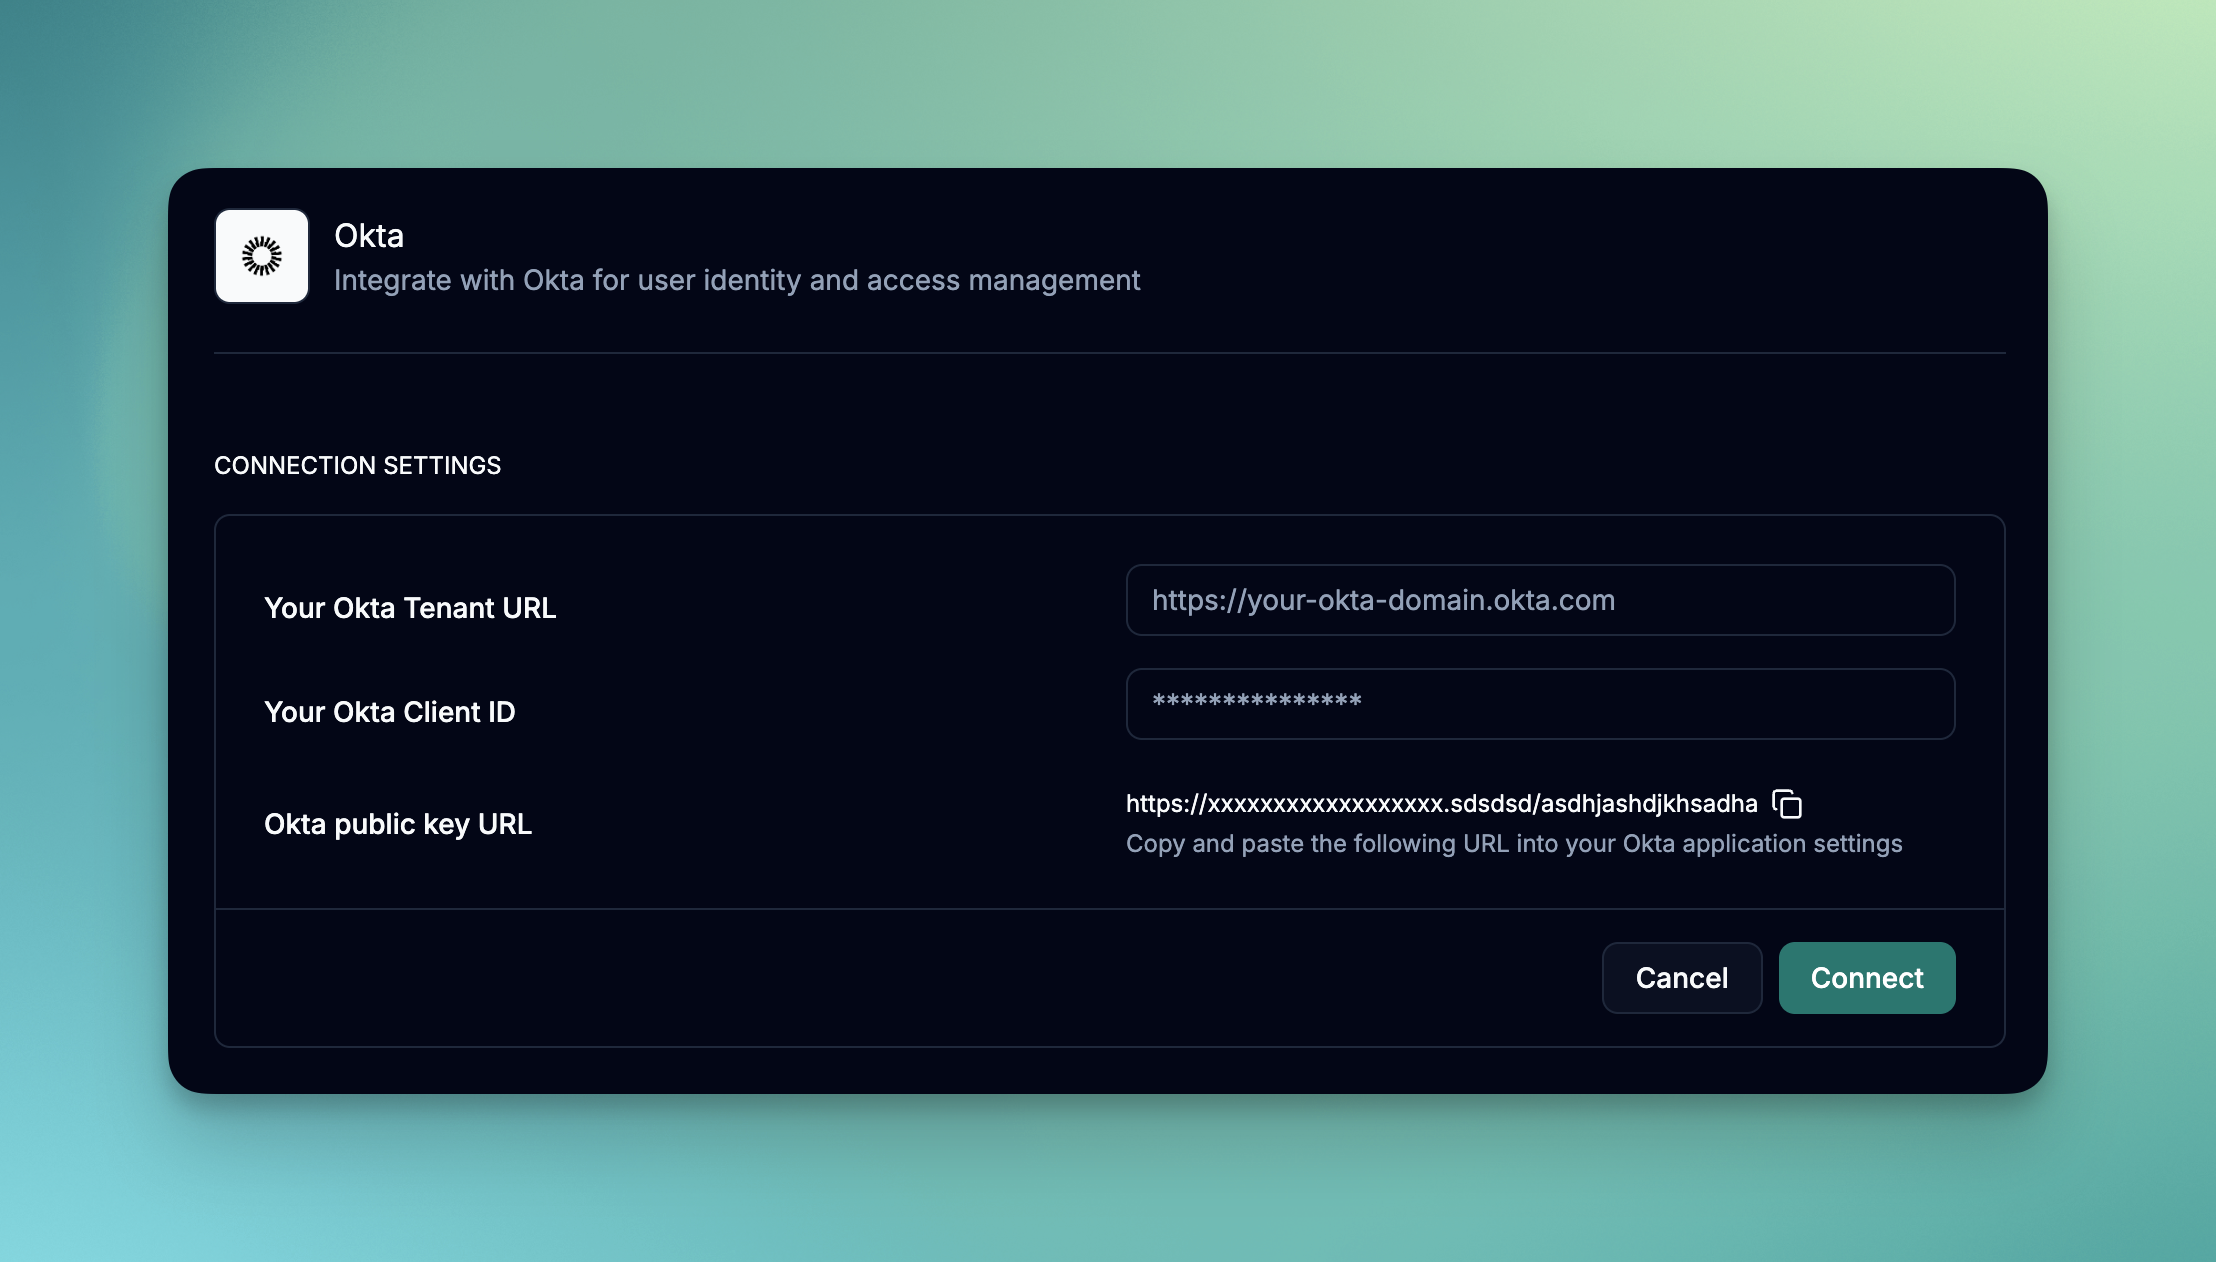
1. Log into June
2. Navigate to Integrations page
3. Choose "Okta" from the available integrations
4. Before you enter any details, you will need to create an Okta OAuth 2.0 application.
5. Copy the **Okta public key URL**. You will need this for configuring client credentials using **PUBLIC KEYS** in Okta.
1. Log into your Okta admin console
2. Navigate to **Applications > Applications**
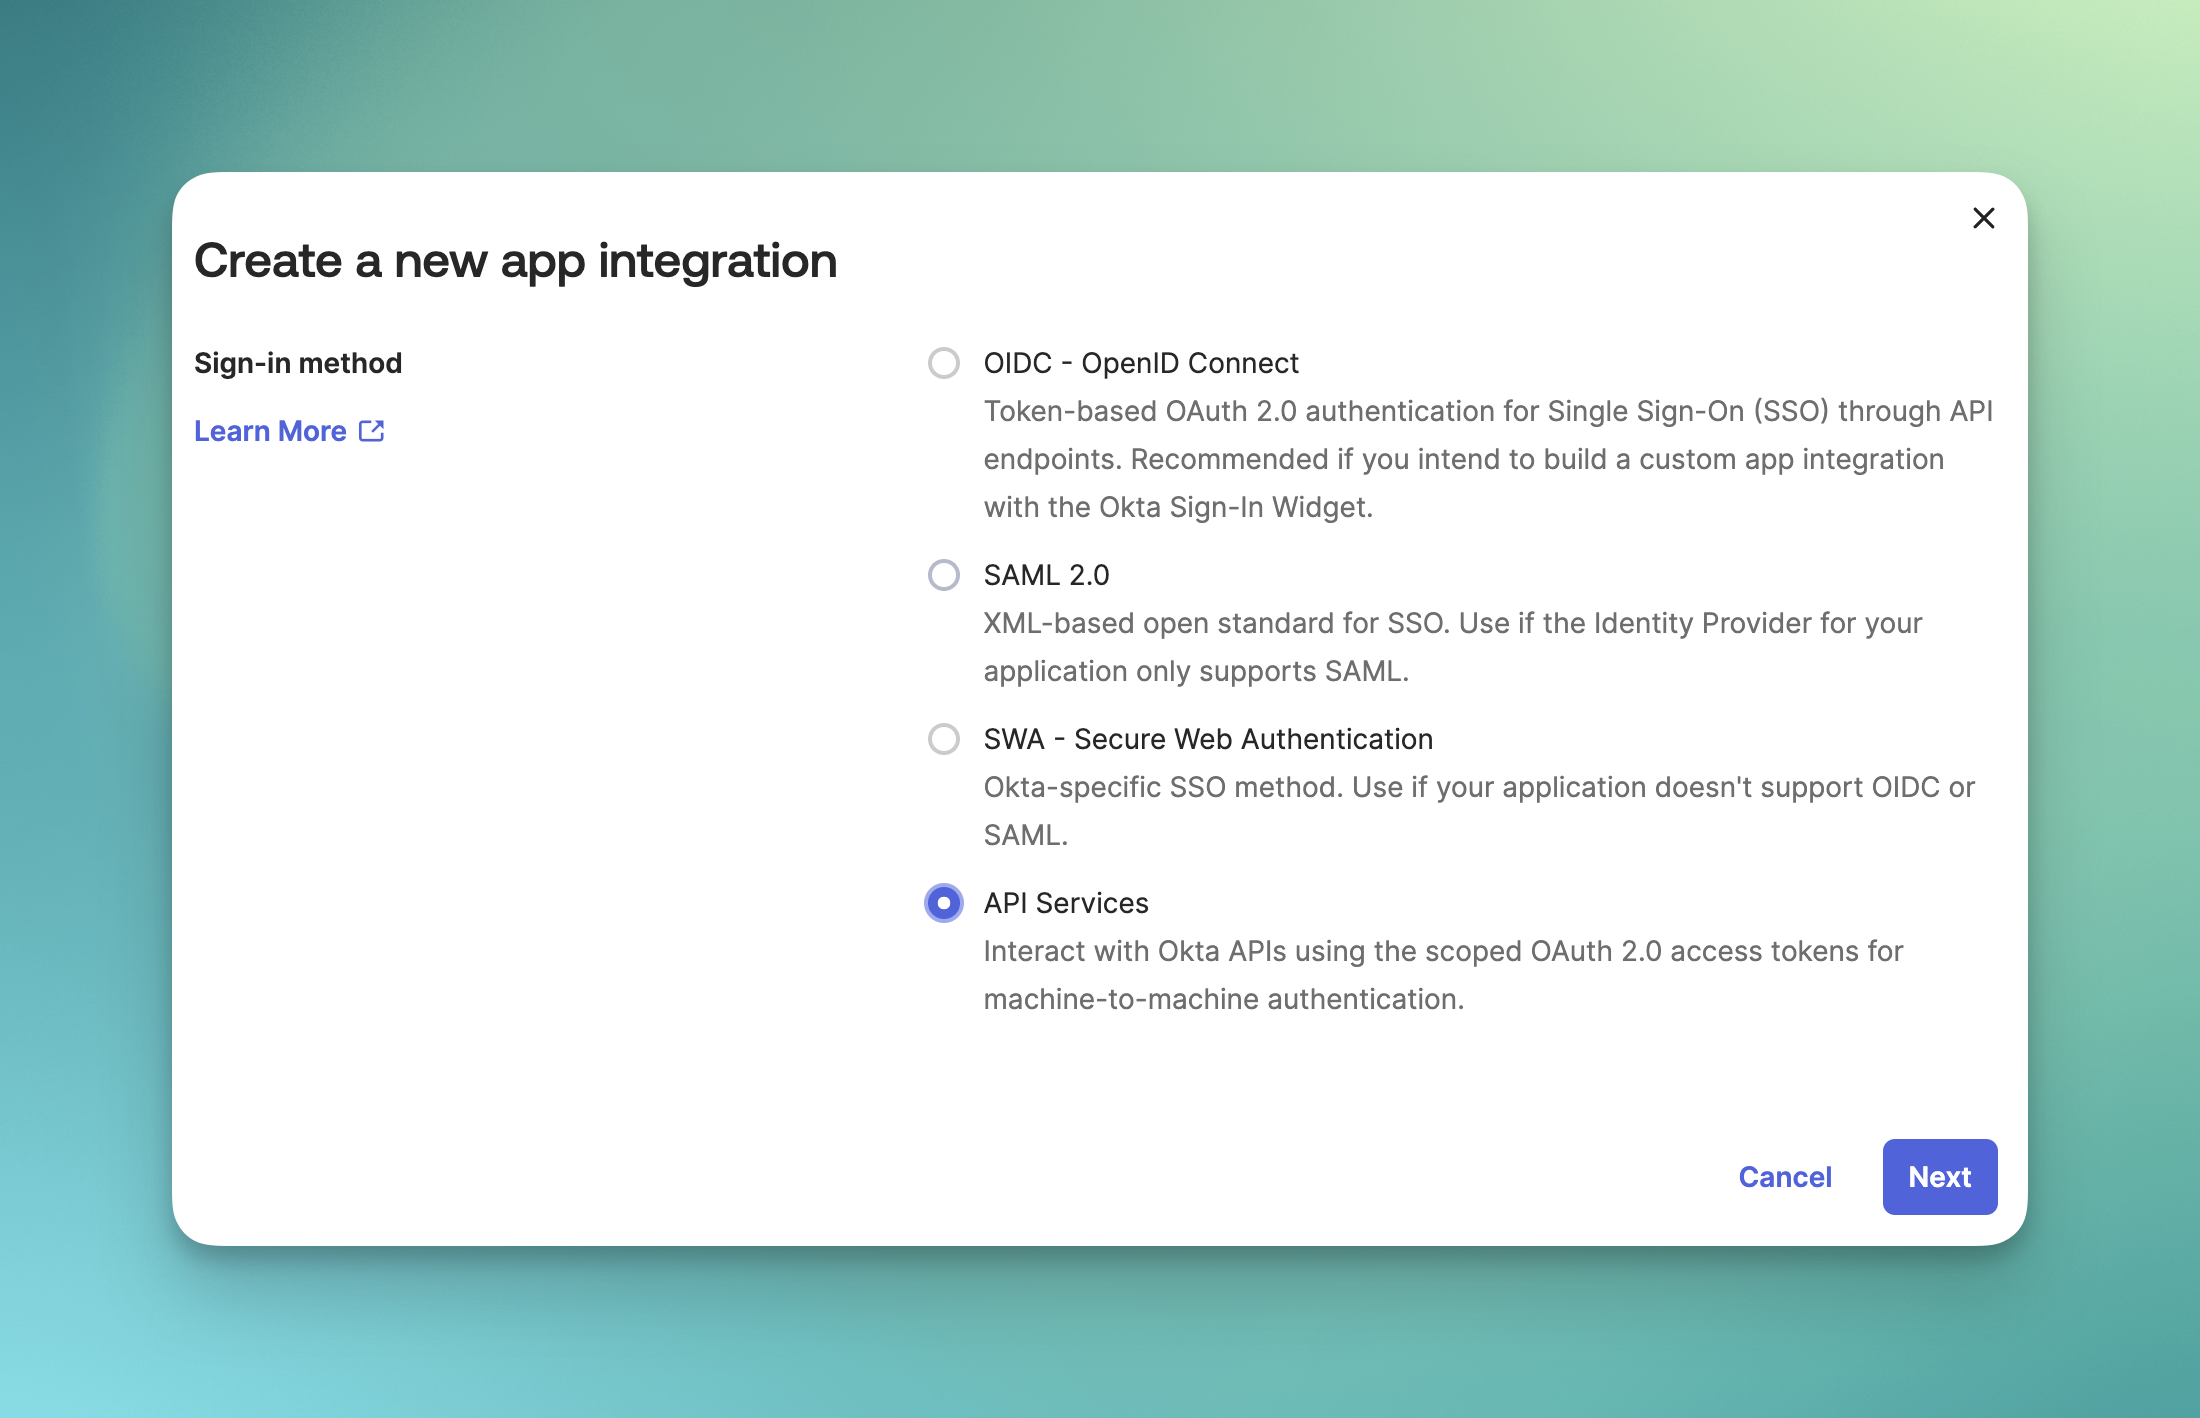
3. Click **Create App Integration**
1. Select **API Services** as the sign-in method
2. Click **Next** to continue
3. Enter application name: "June API Integration"
Connect your Okta environment with June to enable secure API-based access to users, groups, and application assignments.
## What you'll accomplish
* Create an Okta OAuth 2.0 application
* Assign admin roles to the app
* Provide June with your client ID and tenant URL
* Enable automated identity data ingestion
## Capabilities
Once connected, June provides the following capabilities for Okta:
### Data Synchronization
| Capability | Description |
| ------------------------------ | --------------------------------------------------------------------------- |
| **Sync all employees** | Sync all your employees into June. For IDP integrations, this is always on. |
| **Sync Software Applications** | Sync all your software applications into June. |
| **Sync locations** | Sync all your office locations into June. |
### Security Actions
| Capability | Description |
| -------------------------------- | ------------------------------------------------------------------------------------------------------------------------------------------------------------------ |
| **Expire user password in Okta** | Expire a user's password in Okta, forcing them to change it on next login. This is a security action used for compromised accounts or password policy enforcement. |
| **Reset user MFA in Okta** | Reset all MFA factors for a locked out user in Okta. This removes all enrolled MFA factors and allows the user to enroll new ones. |
### Group Management
| Capability | Description |
| ------------------------------- | --------------------------------------------------------------------------------------------------------- |
| **Add user to Okta group** | Add an employee to an Okta group to grant them group-based access and permissions. |
| **Remove user from Okta group** | Remove an employee from an Okta group to revoke their group-based access and permissions. |
| **List Okta groups** | Retrieve a list of all groups in Okta. Optionally filter by search query to find specific groups by name. |
| **Get Okta group details** | Retrieve detailed information about a specific Okta group including its members. |
## Prerequisites
Before starting the integration, ensure you have:
* Okta Super Admin access
* Access to create OAuth 2.0 applications in Okta
## Okta OAuth 2.0 Application setup
### Step 1: Add June Application in Okta
1. Log into June
2. Navigate to Integrations page
3. Choose "Okta" from the available integrations
4. Before you enter any details, you will need to create an Okta OAuth 2.0 application.
5. Copy the **Okta public key URL**. You will need this for configuring client credentials using **PUBLIC KEYS** in Okta.
1. Log into your Okta admin console
2. Navigate to **Applications > Applications**
3. Click **Create App Integration**
1. Select **API Services** as the sign-in method
2. Click **Next** to continue
3. Enter application name: "June API Integration"
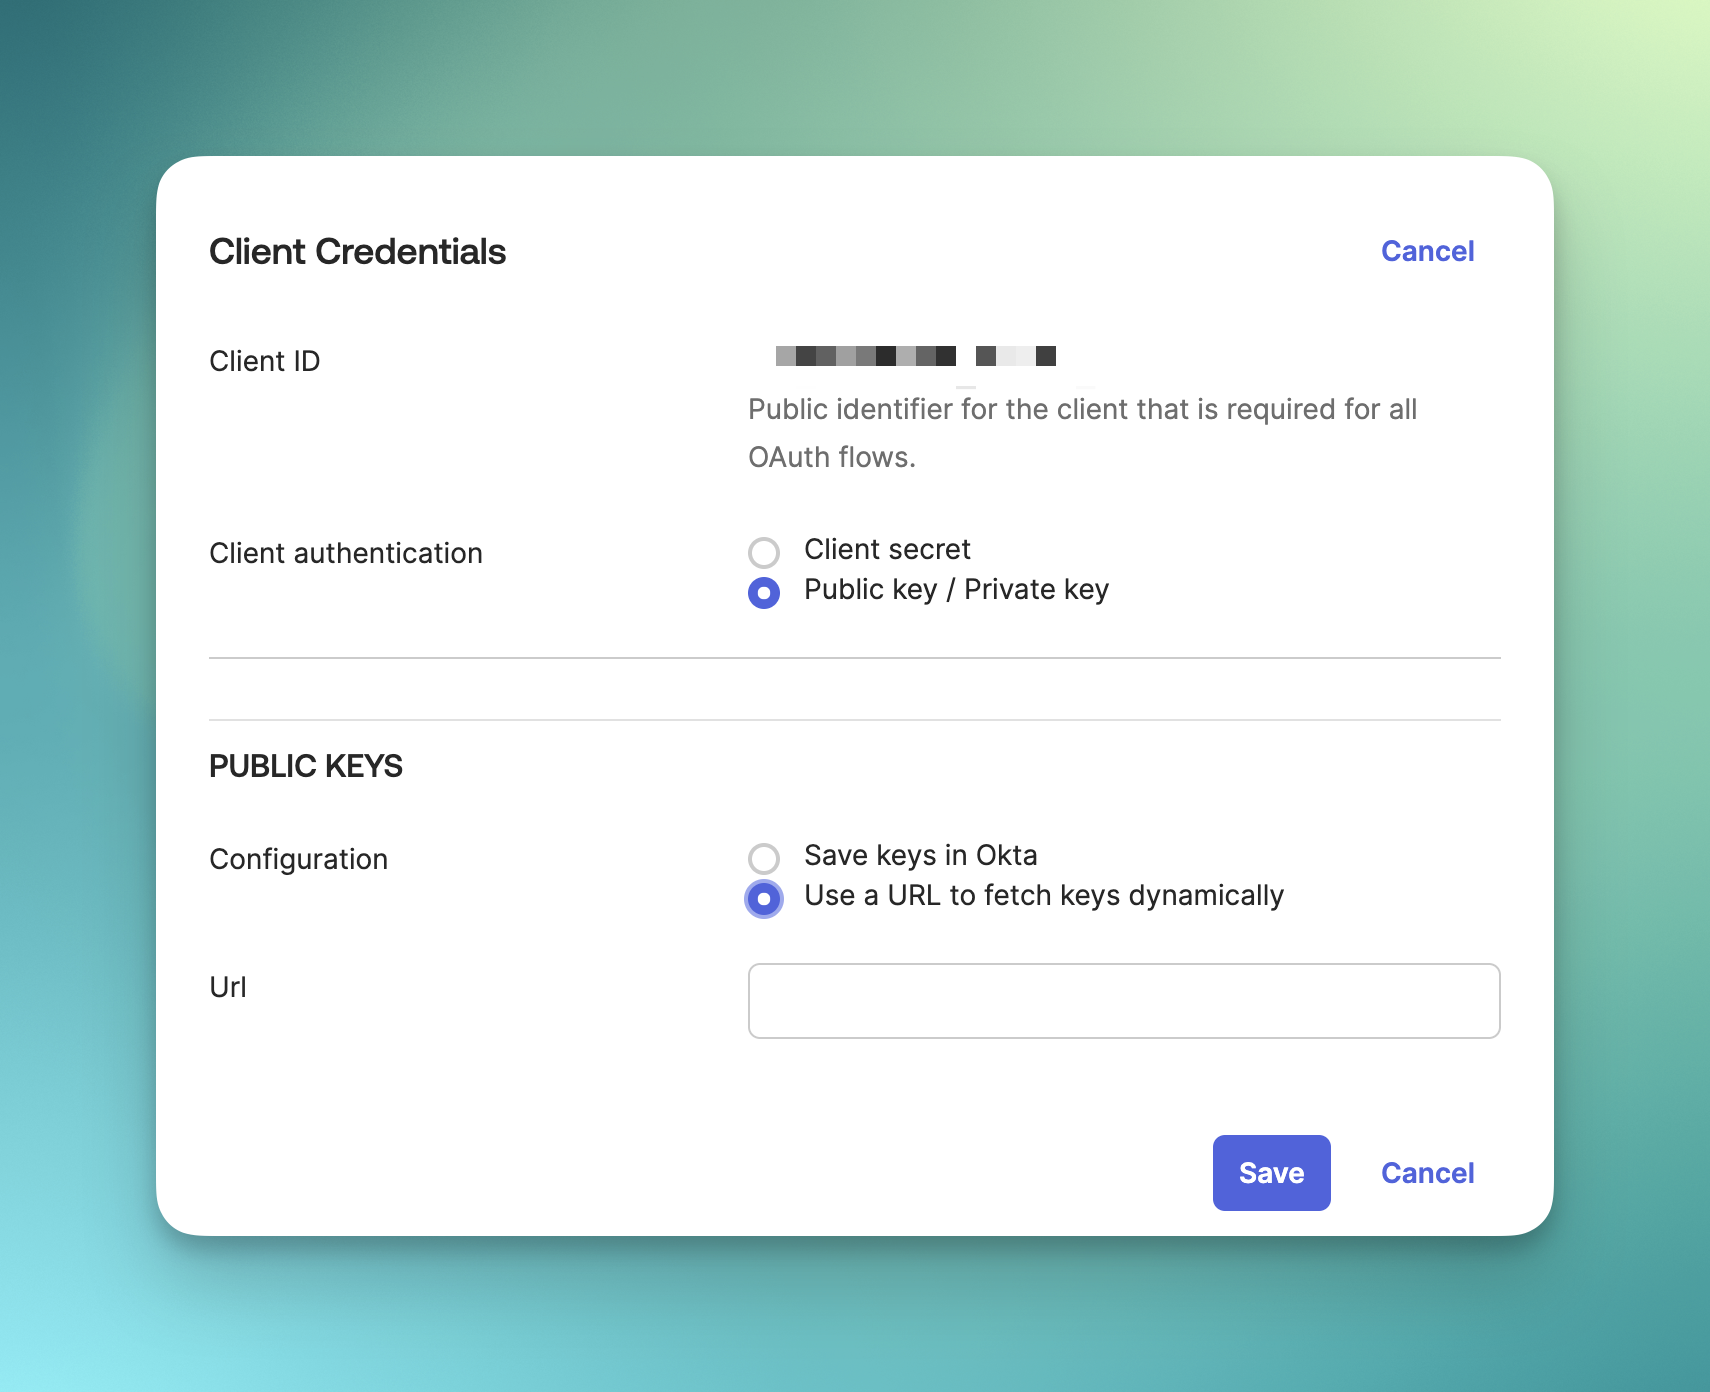
 1. Select the **June API Integration** application
2. Go to the **General** tab
3. Click **Edit** on the **Client Credentials** section
4. Select **Public key / Private key** option
5. Under **PUBLIC KEYS**, select **Use a URL to fetch keys dynamically**
6. and add the **Okta public key URL** you copied earlier to the **Url** field.
7. Click **Save**
1. Select the **June API Integration** application
2. Go to the **General** tab
3. Click **Edit** on the **Client Credentials** section
4. Select **Public key / Private key** option
5. Under **PUBLIC KEYS**, select **Use a URL to fetch keys dynamically**
6. and add the **Okta public key URL** you copied earlier to the **Url** field.
7. Click **Save**
 1. Go to the **General** tab
2. Click **Edit** on the **General Settings** section
3. Uncheck the **Require Demonstrating Proof of Possession (DPoP) header in token requests** checkbox
4. Click **Save**
1. Go to the **Okta API Scopes** tab
2. Grant the following scopes to the application:
* `okta.users.read`
* `okta.groups.read`
* `okta.apps.read`
* `okta.logs.read`
* `okta.apps.manage`
* `okta.groups.manage`
* `okta.users.manage`
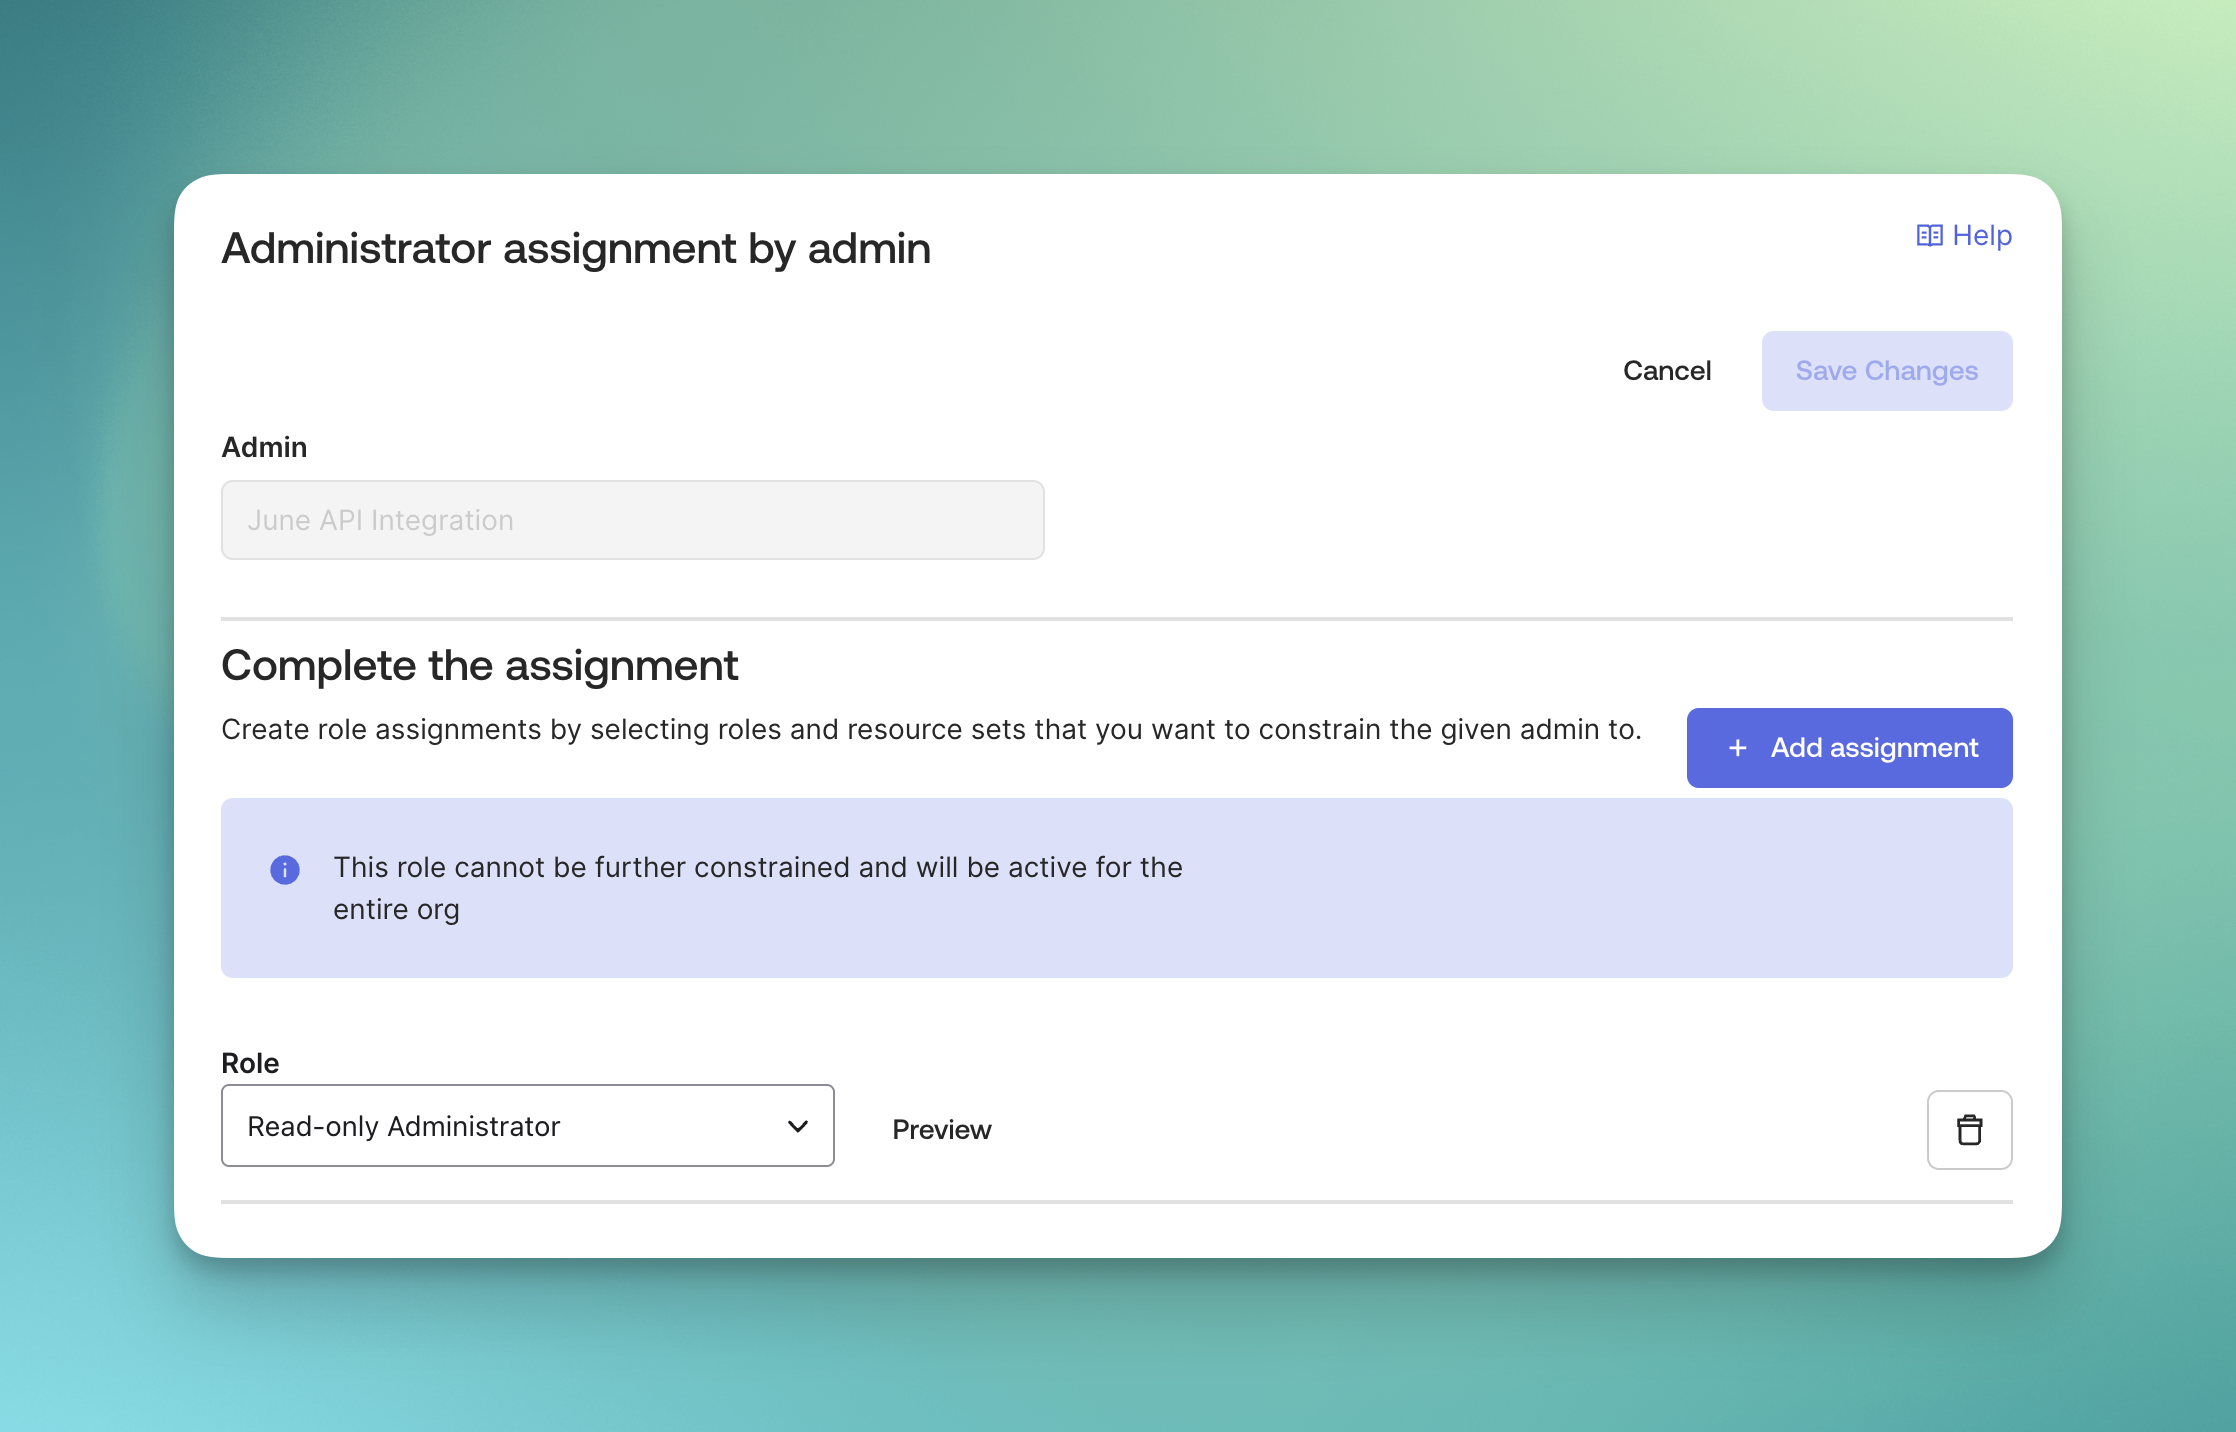
1. Go to the **Admin roles** tab
2. Click **Edit assignments**
3. Select **Read-only Administrator** role to assign to the application
4. Click **Save Changes**
1. Go to the **General** tab
2. Click **Edit** on the **General Settings** section
3. Uncheck the **Require Demonstrating Proof of Possession (DPoP) header in token requests** checkbox
4. Click **Save**
1. Go to the **Okta API Scopes** tab
2. Grant the following scopes to the application:
* `okta.users.read`
* `okta.groups.read`
* `okta.apps.read`
* `okta.logs.read`
* `okta.apps.manage`
* `okta.groups.manage`
* `okta.users.manage`
1. Go to the **Admin roles** tab
2. Click **Edit assignments**
3. Select **Read-only Administrator** role to assign to the application
4. Click **Save Changes**
 ### Step 2: Set up Okta Integration in June
1. Go back to June integrations page and select **Okta**
2. Copy the **Client ID** from the **Client Credentials** section in Okta and paste it in the **Client ID** field
3. Copy your Okta tenant URL and paste it in the **Tenant URL** field
4. Click **Save**
5. If the integration is successful, you should see a message saying "Integration setup complete" and the **Status** should be **Active**.
1. Click on the dropdown menu that has the status of the integration
2. Click **Test Integration**
3. If the integration is successful, you should see a message saying "Integration test successful" and the **Status** should be **Active**.
4. If the integration is not successful, you should see a message saying "Integration test failed" and the **Status** should be **Inactive**.
1. Click on the dropdown menu that has the status of the integration
2. Click **Sync Now**
3. You should see the employees from Okta being synced to June under the **Employees** tab.
## Support Resources
Need help with your Okta integration?
* **Okta Documentation**: Review this [article](https://support.okta.com/help/s/article/403-error-with-org2org-provisioning-with-oauth?language=en_US) about why June needs admin roles assigned.
* **June Support**: Contact support for integration-specific assistance
* **Community Forum**: Join discussions about identity provider integrations
Syncing data from Okta to June may take up to 15 minutes based on the number of users in your Okta environment.
### Step 2: Set up Okta Integration in June
1. Go back to June integrations page and select **Okta**
2. Copy the **Client ID** from the **Client Credentials** section in Okta and paste it in the **Client ID** field
3. Copy your Okta tenant URL and paste it in the **Tenant URL** field
4. Click **Save**
5. If the integration is successful, you should see a message saying "Integration setup complete" and the **Status** should be **Active**.
1. Click on the dropdown menu that has the status of the integration
2. Click **Test Integration**
3. If the integration is successful, you should see a message saying "Integration test successful" and the **Status** should be **Active**.
4. If the integration is not successful, you should see a message saying "Integration test failed" and the **Status** should be **Inactive**.
1. Click on the dropdown menu that has the status of the integration
2. Click **Sync Now**
3. You should see the employees from Okta being synced to June under the **Employees** tab.
## Support Resources
Need help with your Okta integration?
* **Okta Documentation**: Review this [article](https://support.okta.com/help/s/article/403-error-with-org2org-provisioning-with-oauth?language=en_US) about why June needs admin roles assigned.
* **June Support**: Contact support for integration-specific assistance
* **Community Forum**: Join discussions about identity provider integrations
Syncing data from Okta to June may take up to 15 minutes based on the number of users in your Okta environment.